

staying rooted
Staying Rooted in Your Yoga Practice This Fall
It’s that time of year again, when the leaves begin to change and so do our routines. Fall is beautiful, but it can also be busy. Between work, school, social events, and family commitments, it’s easy for our yoga practice and mindful routines to slowly slip into the background. At first, it might be a missed morning or evening on the mat. Then, a week goes by. Before we know it, our yoga mat stays rolled up longer than we’d like.
So how do we stay rooted in our practice when the busyness of the season threatens to pull us away?
What does it mean to be rooted in your practice?
Being rooted in yoga isn’t just about showing up to class or perfecting a pose. It’s about cultivating stability, balance, and awareness in both body and mind. A consistent yoga practice nourishes our physical health, mental clarity, and emotional resilience.
When life gets hectic, we might miss a session here or there, but staying rooted is about returning, again and again, with intention and presence. It’s about honoring our body, connecting with our breath, and finding stillness amid the noise of the season. The deeper our roots, the more grounded we are; even when schedules get tight or stress starts to weigh us down.
Three ways to stay rooted in your yoga practice
1. Find Mindfulness in the Small Moments
Even if you can’t get to a full class, you can practice mindfulness throughout your day. These small pockets of attention—pausing to breathe deeply while making breakfast, stretching at your desk, or taking a mindful walk outside—can keep you connected to your practice.
Consistency doesn’t always mean big blocks of time. The cumulative effect of these small moments nourishes your body and mind, helping you carry the calm and focus of your practice into every part of your day.
2. Practice with Community
Yoga is both personal and communal. Practicing with others—whether in a class, workshop, or informal group—can keep you motivated and accountable. Sharing your journey, learning from others, and connecting in a supportive space reminds us why we practice in the first place.
Invite a friend to class, join a workshop, or participate in a small group flow. The energy of community helps you stay consistent and inspired, even when life gets busy.
3. Return to Your Why
Sometimes we drift from our practice because we’re focused on outcomes—“I want to be stronger,” or “I want to master this pose.” When this happens, it helps to return to the why behind your practice.
Yoga is about connection: to your body, your breath, your mind, and your inner self. It’s not about perfection, it’s all about showing up. Remembering why you started, whether it was to reduce stress, gain flexibility, or simply feel more present, can reignite your motivation and bring you back to the mat with joy instead of obligation.
As this season unfolds, let’s anchor ourselves in our practice. Make time to breathe, move, and reconnect both on and off the mat. The deeper your roots, the more steady and grounded you’ll feel, no matter how busy the season becomes.
Ayurveda: The Ancient Wisdom for Modern RenewaL
As the leaves begin to shift, the air crisps, and we feel ourselves preparing for the inward turn of fall, there’s no better time to pause, reset, and gently renew. Ayurveda, an ancient holistic system of healing rooted in India, offers powerful tools for aligning with nature, nurturing the body, calming the mind, and restoring balance.
What Is Ayurveda & Why It Matters
Ayurveda, which translates to “the science of life,” is one of the world’s oldest holistic healing systems. Rooted in India more than 5,000 years ago, it’s based on the idea that true health comes from balance within your body, your mind, your spirit, and your environment.
At the heart of Ayurveda are the Doshas — Vata, Pitta, and Kapha, which represent different energies and elements in the body. When these doshas are in harmony, we feel energized, focused, and at ease. When they’re out of balance, we might notice it as digestive issues, restless sleep, irritability, fatigue, or even chronic stress.
Why does this matter for us today? Because Ayurveda offers timeless, practical tools for navigating modern life’s chaos. Instead of one-size-fits-all wellness trends, Ayurveda recognizes that every body is unique. It helps us tune in to what our body needs at this particular season, stage of life, and state of mind.
For fall in particular, Ayurveda reminds us that seasonal changes affect us physically and emotionally. The crisp, windy, drying qualities of autumn can leave us feeling scattered, depleted, or sluggish. Ayurvedic practices, like eating warm, nourishing foods, slowing down, and building steady daily rituals, help us stay grounded and resilient as the seasons shift
We’re thrilled to partner with Ivette Desai this season to bring the wisdom of Ayurveda into practice through two powerful offerings:
Fall Ayurvedic Cleanse
October 2 – October 11, 2025
Step into the new season with clarity, balance, and renewed energy. Ivette’s guided 10-day Ayurvedic Cleanse helps you gently release what no longer serves — physically, mentally, and emotionally — while building nourishing habits that last. The program includes:
A Cleansing Guide
Recipe Guide
Meal Planner
Options to Design Your Own Journey
FB Lives in her FB private group
Worksheets to get you oriented and ready for your rejuvenation
Ivette will guide you through the 10 days with 3 live group calls via zoom. All will be recorded in the event you cannot attend.
Personal 45 min 1:1 Discovery session with Ivette as you emerge from the cleanse.
Ayurveda Workshop
Saturday, November 8, 2025
If you’re curious to explore Ayurveda further, join Ivette in person at Thrive on Saturday, November 8th for a special workshop. Together we’ll dive into seasonal practices, rituals, and tools to help you stay grounded as winter approaches. Expect a nourishing blend of yoga, meditation, breathwork, and sound healing woven with Ayurveda’s timeless wisdom.
This workshop is open to everyone whether you joined the Fall Cleanse or are simply looking to learn more about Ayurveda and how it can support your well-being.se or simply want to discover how Ayurveda can support your health and well-being.
Why This Season & Why Now
Life tends to push us into constant motion with work, family, obligations. Ivette speaks to this: she helps people who after filling up everyone’s cup, often feel they’ve neglected themselves and have undervalued their own health, and want to shift from overwhelm and stress into thriving in their bodies and lives.
Doing a fall cleanse and embracing Ayurvedic tools now is a way of giving yourself permission to pause, to lean in to your own care, and to build a foundation that holds you steady and full of ease, rather than running on fumes until burnout.
If you’re ready to feel more grounded, more alive, more at ease, Ayurveda — and Ivette’s guidance — can be the path home.
Pose of the month - marichyasana iii/Sage’s twist

The Subtle Strength of Marichyasana III
Have you been skipping out on Marichyasana III? Let’s change that! This seated twist is one of those poses that sneaks up on you with its deep stretch and strengthening power. While it might look intimidating at first, Marichyasana III has a way of opening up the hips, lengthening the spine, and stretching the shoulders like nothing else. Let’s dive into why this seemingly subtle pose is an absolute game-changer.
Why Marichyasana III Deserves Your Attention
Marichyasana III doesn’t get the credit it deserves. It's not one of those flashy poses that you see plastered all over social media. But trust me, this seated twist is far from basic.
Take it from yoga teacher and practitioner Katelynne Hickston:
“I never truly appreciated Marichyasana III until one day I finally took the time to focus on the full expression of the twist. It was like my entire body exhaled at once. My hips, my lower back, and especially my shoulders felt open in a way they never had before. It’s the perfect blend of stretching and strengthening, and once you find your groove in this pose, it’s hard to resist coming back to it again and again.”
Still not convinced? Let’s take a closer look at the benefits.
Why This Pose is So Powerful
Detox Your Spine: Twists are known for their detoxifying effects, helping to massage the internal organs, improve digestion, and release tension in the spine.
Open Your Hips and Hamstrings: By extending the leg in front of you and twisting, this pose provides an excellent stretch for your hips and hamstrings, which are often tight from sitting.
Boost Your Spinal Mobility: Marichyasana III works wonders for spinal flexibility and mobility, helping to keep the back healthy and fluid.
Chest and Shoulder Stretch: The arm reaching behind your back isn’t just for fun—it helps to open up the chest and shoulders, improving posture over time.
Core Activation: The twist and the engagement required in this pose help strengthen the core muscles, especially the obliques.
Bonus? It’s versatile. You can modify it to suit your flexibility level while still reaping all the benefits.
Tips for Perfecting Marichyasana III
Leg Setup
Start seated with both legs extended straight in front of you.
Bend your right knee, bringing the foot toward the base of the inner thigh (the more comfortable and accessible your bend, the better).
Extend your left leg straight out, ensuring the left foot is flexed and in line with your left hip.
Ensure both hips are squared to the front, with your left leg firmly grounded and your right foot stable on the mat.
Pro Tip: If your hamstrings are tight, sit on a folded blanket to elevate your hips. This will allow for a longer spine and a deeper twist.
Lengthen Through the Spine
Sit up tall, creating length through the spine—imagine a string pulling the crown of your head toward the ceiling.
Begin the twist by drawing your right ribs back and turning the torso to the right.
Your left hand can come to the floor behind you, or you can place it on the floor near the extended left leg for support. Your right arm will reach across to your left foot or shin—whichever feels accessible for your body.
Pro Tip: Keep your chest open and avoid collapsing forward. The twist comes from the spine, not just the arms!
Arm Positioning
Right Arm: Reaches across your body, either placing the hand on the outer left thigh or the floor next to the extended leg.
Left Arm: Reaches behind your back and can either grip the mat or a strap for additional support. Engage the back muscles to help rotate further.
Pro Tip: Try to keep the right elbow in front of your body as you twist. This will help you move deeper into the pose while keeping the chest open.
Where to Look
Your gaze will typically follow the direction of the twist. Look over your left shoulder if your neck allows, but don’t force it. Always keep your neck in a comfortable position.
Things to Keep in Mind
Don’t rush the twist—take your time, ensuring that each part of your body is aligned and comfortable. Focus on lengthening the spine rather than forcing the twist.
Engage your core as you twist to protect your lower back.
Hips squared to the front. Try not to let your left hip roll back as you twist. Keep it grounded and aligned.
Avoid rounding your back. It’s tempting to try to get deeper into the pose, but a rounded back won’t give you the benefits you’re looking for. Keep your spine long and strong.
Ways to Enhance the Pose
Use a Strap: If your hands don’t quite meet around your leg, use a strap to loop around the foot and work your way toward the bind.
Add a Shoulder Opener: For an extra stretch, place your left arm behind you in the twist, but lift it off the floor to activate the shoulders.
Deepen the Twist: Engage your core even more by gently pressing your hand into your thigh to deepen the rotation.
A Quick Word on Safety
If you have any existing back issues or shoulder problems, be cautious with this pose. It's always a good idea to warm up with some gentle twists before attempting Marichyasana III.
Listen to your body—if anything feels sharp or painful, ease out of the twist and adjust your position. Always prioritize comfort over depth.
Marichyasana III may not always steal the spotlight in your practice, but it’s definitely a hidden gem worth exploring. With its blend of flexibility, strength, and detoxifying benefits, this seated twist will leave you feeling both energized and relaxed. Plus, who doesn’t love a twist that works your core and opens your shoulders at the same time?
Give it a try next time you’re on the mat—you might just find yourself coming back to it every practice!
pose of the month Parighasana/gate pose

Why Gate Pose (Parighasana) Should Be Part of Your Daily Movement
Have you been sleeping on Gate Pose? Let’s change that! Parighasana is the ultimate side bend that hits all the right places, giving you that stretch and a surprise glute burn. Yep, it’s spicy and sweet. Plus, this pose comes with all sorts of options to suit your vibe. Let’s get into why this seemingly low-key pose deserves the spotlight!
Why Gate Pose is a Game-Changer
Let’s be real—Gate Pose lives a surprisingly unexceptional life. It’s not flashy, and it rarely tops anyone’s "must-practice" list. But why?!
Take it from Yoga Journal’s senior editor Renee Marie Schettler:
“I was at least a decade into practicing yoga before I experienced Parighasana for the first time. And I was immediately dumbfounded. Where had this pose been my entire life?! No other pose creates such an extended yet supported stretch along my entire side body (and, when I shift my hips slightly forward, my aching IT bands). There’s also an ease and a grace about it that I feel I take away with me into life each time I practice it. I often joke with students that I could stay in this pose for the rest of class. Heck, I could stay here the rest of my life.”
If you haven’t felt that magic yet, you’re about to.
Benefits of Gate Pose
Posture Perfection: Counteracts the effects of sitting (because who isn’t stuck at a desk these days?).
Side Body Strength: Targets the obliques and intercostal muscles—hello core power!
Back Love: Stretches the latissimus dorsi and erector spinae, those big back muscles you didn’t know needed attention.
Happy Ankles & Feet: Strengthens the often-neglected lower body parts.
Bonus? It’s super accessible. No acrobatics required.
How to Rock Gate Pose
Legs
One knee directly under the hip, bent at 90 degrees, top of the foot on the floor.
Opposite leg extended out straight, knee pointed the same direction as your hips.
Big toe, heel, and blade of the extended foot on the floor.
Hips stacked over the supporting knee.
✨ Pro Tip: If your knees aren’t loving the floor, pad them with a folded mat or pillows. Comfort is key!
Upper Body
Shoulders aligned with hips and supporting knee.
Spine long, crown of the head reaching away from the hips.
Lateral bend from the hip through the spine, ribs in line with hips and legs.
Shoulder blades moving down the back.
Pro Tip: Think about rotating your ribs toward the ceiling for that extra side stretch goodness.
Arms
Supported Leg Side Arm: Hand on the floor, arm straight, shoulder away from the ear. Engage the glutes if supporting with the arm feels tough.
Extended Leg Side Arm: Reaches up and over, palm facing the floor, shoulder away from the ear.
Gaze
Traditionally, your gaze goes up toward the ceiling—but follow your neck’s comfort zone.
Key Things to Watch
Don’t let that booty stick back—keep those hips stacked!
Roll your sternum (breastbone) toward the ceiling for a deeper stretch.
Variations and Spicy Add-Ons
Place the ball of your extended foot on the floor for an extra calf stretch.
Add a side crunch for a serious oblique burner.
Hold a weight in the extended arm for a strength boost.
A Quick Word on Safety
If you’ve had a knee replacement or deal with bursitis, padding your knees is a must. Always listen to your body, and don’t push through sharp pain.
Gate Pose may not be the flashy star of your practice, but it’s the secret sauce your body will thank you for. From improving posture to building core strength and giving your side body some much-needed love, this pose is the underrated gem that deserves a spot in your daily movement. Plus, who can say no to a little glute burn fire? 🔥
Give Parighasana a try today—your side body, back, and glutes will be so glad you did.
Unlock Strength and Flexibility with Salabhasana/Locust Pose

Salabhasana, which translates to "Locust Pose" in Sanskrit, is a backbend pose that primarily targets the lower back, glutes, thighs, and core muscles. Named after the locust insect, this pose requires you to lift your legs, chest, and arms off the ground, resembling the shape of a locust in flight. It is a challenging yet rewarding posture that strengthens the posterior chain (the muscles on the back of your body), often neglected in everyday activities. Salabhasana also improves spinal alignment and flexibility, providing a deep stretch for the front of the body. Whether you're a beginner or an experienced yogi, Salabhasana can offer numerous benefits for your physical and mental well-being.
Benefits of Salabhasana
Strengthens the Back and Core: Salabhasana is an excellent pose for building strength in the back, particularly in the lower back and the muscles along the spine. By lifting your chest and legs off the ground, you engage the core, glutes, and hamstrings, helping to tone and strengthen these areas. A strong core is essential for supporting the spine and preventing back pain.
Improves Posture: Regular practice of Salabhasana helps to open up the chest and shoulders, improving overall posture. Many people suffer from rounded shoulders and slouched spines due to prolonged sitting, and this pose can counteract these imbalances by promoting better spinal alignment.
Increases Flexibility: As a backbend, Salabhasana stretches the chest, abdomen, and hips. It also lengthens the muscles of the legs and thighs, increasing flexibility and mobility. Over time, consistent practice can lead to greater flexibility in the spine and hips.
Boosts Energy and Vitality: The act of lifting the chest and legs off the ground helps to stimulate the energy centers of the body. Salabhasana can boost your energy, reduce stress, and improve circulation throughout the body. It’s often used in yoga sequences to awaken the body and mind.
Stimulates Digestion: The compression of the abdomen while lifting the legs and chest can stimulate the digestive organs, promoting better digestion and overall gut health. This can be particularly helpful for people with bloating or digestive discomfort.
How to Practice Salabhasana
Start on Your Belly
Begin by lying face down on your yoga mat with your legs extended behind you, hip-width apart. Keep your arms at your sides with your palms facing downward.
Engage the Core
As you inhale, draw your navel toward your spine and engage your core. This will help protect your lower back as you lift your chest and legs.
Lift Your Chest and Legs
If you're new to backbends or back strengthening, start with a modified version of the pose. You can lift only your legs or your chest at first, building strength and confidence gradually.
Otherwise, On your next inhale, gently lift your chest, legs, and arms off the ground, using the strength of your back, glutes, and legs. Keep your gaze forward, and make sure to keep your neck in a neutral position, not straining to look up.
Activate the Glutes and Thighs
Keep your pelvis on the ground to avoid straining your lower back. Engage your glutes and thighs to help lift your legs higher. Your feet should be active, with the tops of your feet pointing downward and your toes reaching toward the mat.
Using the Breath
Inhale as you lift your chest and legs. Hold Salabhasana for 15–30 seconds, breathing deeply and maintaining a steady gaze. Controlled breathing helps maintain stability and ease during the pose. Focus on lifting through the chest and thighs, keeping the shoulders relaxed and away from the ears. To release, exhale as you slowly lower your chest, legs, and arms back down to the mat. Rest for a moment in a prone position before repeating the pose if desired.
Avoid Overstraining
If you feel any discomfort in your lower back or neck, back off the pose. Ensure that you are lifting with the strength of your muscles, not straining with force.
Variations of Salabhasana
Supported Salabhasana: If you have back pain or discomfort, you can use props such as a bolster or cushion under your abdomen for support, helping to alleviate pressure on the lower back.
Ardha Salabhasana (Half Locust Pose): In this variation, you lift only one leg at a time, keeping the chest and arms on the mat. This is a gentler variation that helps build strength in the legs and lower back before progressing to the full pose.
Salabhasana with Arm Extension: Instead of keeping your arms at your sides, you can extend them forward, creating a more dynamic stretch through the entire body. This increases the stretch in the chest and arms.
Salabhasana, or Locust Pose, is a fantastic way to build strength, and flexibility, and improve posture. Whether you're looking to alleviate back pain, enhance your yoga practice, or simply add variety to your routine, this pose has much to offer. Practice regularly and with awareness, and you'll soon notice the benefits manifesting in both your body and mind.
Salabhasana may not be suitable for everyone. If you have a back injury, severe back pain, a neck injury, or if you are pregnant you may want to avoid practicing this pose.
Finding Balance Between Earth and Sky: Mastering Dandasana (Staff Pose)

Have you ever noticed how often we sit in chairs, at desks, or on couches—rarely finding ourselves seated on the floor? For many adults, sitting on the ground can feel surprisingly uncomfortable. That’s where the practice of Dandasana, or Staff Pose, comes in.
Dandasana is a foundational seated posture that teaches us how to align the legs, pelvis, and spine while grounding down and lifting up—creating a powerful balance between earth and sky. It’s often practiced on the way into deeper poses like seated twists or forward folds, such as Janu Sirsasana (One-Legged Forward Bend). Interestingly, B.K.S. Iyengar even references Dandasana in the setup for Paripurna Navasana (Boat Pose) in Light on Yoga.
Why Dandasana Matters
As simple as it may seem, this beginner-friendly pose offers immense benefits:
Improves Posture: It trains the body to sit upright by activating core and back muscles.
Strengthens the Back: The muscles along the spine are engaged, building endurance and stability.
Opens the Chest and Shoulders: The posture promotes a broad, open-hearted stance that counters forward-leaning habits.
Enhances Body Awareness: The grounding through the legs and dynamic lift of the spine encourage a mindful connection between movement and stillness.
Mastering Dandasana prepares the body for more complex seated postures and helps cultivate a deeper sense of presence and alignment.
How to Practice Dandasana
Find Your Foundation: Sit on a folded blanket or yoga block to lift the hips slightly if your hamstrings or lower back feel tight. Extend your legs straight out in front of you, keeping the ankles, knees, and thighs together.
Align the Sit Bones: Gently pull the flesh of your buttocks back and apart so you’re sitting evenly on your sit bones.
Activate the Legs: Point the toes up and draw them slightly back toward you. Press your heels forward along the floor, while pulling up your kneecaps and pressing the backs of the knees down.
Place Your Hands: Rest your palms or fingertips on the floor beside your hips with fingers pointing forward. Your arms can be straight or slightly bent, depending on comfort.
Lift and Lengthen: Roll your shoulders back, draw the shoulder blades together, and move them down your back. Lift your sternum and heart as you lengthen the entire spine—from the tailbone through to the crown of your head.
Gaze Forward: Keep your head neutral and look ahead at eye level.
Hold the Pose: Stay in Dandasana for 3 to 5 deep, steady breaths, feeling both the rootedness of your lower body and the expansive lift of your upper body.
Quick Tip for Extra Length
For an added challenge and more length through the spine, extend your arms upward alongside your ears into Urdhva Hasta Dandasana. Reach from your hips through the armpits, all the way to your fingertips to create even more spaciousness and energy.
The Wisdom in Simplicity
Though it may look simple, Dandasana is a powerful reminder that true alignment begins with a solid foundation. Practicing this posture with intention can help you sit taller, breathe more freely, and cultivate the strength and awareness needed for more advanced poses. It’s a perfect example of finding grace in the basics—rooting down, rising up, and embracing the balance between earth and sky.
Next time you unroll your mat, give Dandasana the time it deserves. It’s not just a pass-through pose—it’s the foundation of seated practice and a gateway to deeper alignment, both on and off the mat!
Is your practice lacking depth?
Is Your Yoga Practice Missing Depth? Here’s How to Find It
Ever feel like your yoga practice isn’t quite hitting the mark? Lately, I’ve been reflecting on how our piecemeal approach to yoga can shortchange the immense potential of this transformative practice.
Most of us approach yoga as something we fit into our busy schedules—a group class here, another there, with whichever teacher happens to be leading. Sporadic and casual, this method often lacks the critical elements of commitment, consistency, and depth.
While group classes are a wonderful way to build community and catch glimpses of yoga’s philosophical richness, they can sometimes be treated as just another workout. The sweat, the flow, the “check it off my to-do list” mentality often overshadow yoga’s deeper purpose.
Yoga isn’t just exercise; it’s a lifestyle and worldview with the potential to transform how we relate to ourselves and the world. When approached holistically, yoga can inspire solutions to our global challenges—our environmental crises, societal divisions, and individualism. But to unlock this potential, yoga must be practiced as a complete system.
At Thrive, we strive to weave philosophy, breathwork, and mindfulness into every class. But even with our best efforts, a 60 - 90 minute class can only scratch the surface. For students who attend sporadically, these glimpses into yoga’s depth often feel disjointed. True understanding requires commitment—a regular practice that builds on itself over time.
Yoga is most transformative when approached with dedication. As Swami Satchidananda beautifully said:
“There’s no value in digging shallow wells in a hundred places. Decide on one place and dig deep. Even if you encounter a rock, use dynamite and keep going down.”
In our “quick-fix” culture, we’re tempted to scatter our energy across countless pursuits, always chasing the next new thing. But yoga asks us to stay the course—to dig deep and find fulfillment in commitment.
4 Ways to Add Depth to Your Practice
Commit to Consistency
Find a teacher who lives and shares yoga as a lifestyle. Attend their classes regularly and notice how their teachings start to resonate in your daily life. Over time, concepts will connect, and your practice will feel more cohesive and purposeful.Dive into Self-Study
Ask your teacher for book recommendations to explore yoga philosophy on your own. While some ideas may feel esoteric at first, engaging with these texts will enrich your understanding and give your practice new layers of meaning.Explore Beyond the Mat
Deepen your practice by attending workshops, teacher trainings, or specialized programs—even if you don’t plan to teach. These settings allow for focused study and exploration beyond what a regular class can offer.Work One-on-One with a Teacher
Partnering with a teacher for private sessions can provide personalized guidance and help you incorporate yoga’s teachings into your daily life in a systematic way.
The Depth is in the Dedication
Yoga is a lifelong journey, and its rewards come from staying the course. When we commit to digging deep—whether through consistent classes, self-study, or personalized guidance—we move beyond the surface. We begin to experience yoga not just as something we do, but as something we are.
3 Ways Yoga Can How yoga can help your parenting
As the holiday season approaches, parents often find themselves juggling a whirlwind of activities, from shopping for gifts to planning family gatherings. This time of year can be filled with joy but also stress. Practicing yoga can be a powerful tool to help navigate these challenges. Here are three compelling reasons why yoga can improve your parenting, particularly during this busy season.
1. Promotes Mindfulness and Presence
Yoga encourages mindfulness, helping parents stay present in the moment. When you're knee-deep in holiday preparations, it's easy to get overwhelmed by to-do lists and expectations. Yoga teaches you to focus on your breath and body, fostering a sense of calm that can translate into your parenting. By practicing mindfulness, you can engage more fully with your children, responding to their needs with patience and understanding rather than frustration.
2. Enhances Emotional Resilience
The holiday season can stir up a range of emotions—excitement, joy, and, at times, anxiety or sadness. Yoga helps build emotional resilience by providing tools to manage stress and regulate emotions. Through practices such as breathwork and meditation, parents can learn to identify and process their feelings in healthier ways. This emotional awareness can help you model emotional intelligence for your children, teaching them how to navigate their own feelings during the hustle and bustle of the holidays.
3. Fosters Connection and Bonding
Yoga is not only about the individual experience; it can also be a shared family activity. Engaging in yoga together can strengthen the bond between you and your children. It creates a space for open communication, laughter, and shared experiences. Incorporating fun yoga poses or simple mindfulness exercises into family time can help everyone unwind and connect, making the holiday season more meaningful and joyful.
As you prepare for the holiday season, consider incorporating yoga into your routine. Not only can it help you manage stress and stay present, but it also offers an opportunity to model healthy habits for your children. By embracing the principles of yoga, you can create a calmer, more connected family dynamic that enhances your parenting experience. Happy holidays!
Embracing Stillness: December's Focus & Pose of the Month – Savasana

As the year winds down and the holiday buzz ramps up, we invite you to pause, breathe, and surrender into the art of stillness. December is the perfect time to reconnect with yourself, and that's why we're spotlighting Savasana (Corpse Pose) as our Pose of the Month. Often underestimated, this resting pose embodies profound simplicity and the essence of yoga itself: union and release.
Why Savasana?
Savasana is more than just lying down at the end of class; it’s a practice of letting go. It teaches us how to integrate movement, breath, and intention into a moment of stillness. Amid the hustle of holiday shopping, gatherings, and year-end reflections, Savasana serves as a reminder to stop and savor the present moment.
While it isn’t part of the 8 limbs of yoga, it embodies all 8 limbs at once by allowing you to integrate the benefits of the physical postures (asana), mindful breathing (pranayama), and sensory withdrawal (pratyahara) while actively cultivating a state of stillness and awareness, which are key elements of the later limbs like dharana (concentration) and dhyana (meditation) by the end of a yoga practice; essentially acting as a bridge between the physical practice and the more subtle energy aspects of yoga.
Physically, this pose encourages full-body relaxation, promoting recovery and calming the nervous system. Mentally, it offers a space to declutter the mind, fostering clarity and inner peace.
How to Practice Savasana
Set the Scene: Lie flat on your back, allowing your arms and legs to rest comfortably. Palms face upward, signaling openness and receptivity.
Alignment Matters: Support your lower back with a bolster or adjust your head with a folded blanket if needed to ensure comfort.
Breathe Naturally: Let your breath flow without force. Each exhale is an invitation to release tension and sink deeper into the mat.
Let Go: Release the urge to control or plan. Imagine melting into the earth beneath you.
Savasana Beyond the Mat
As we embrace Savasana in our December classes, let its lessons extend into your daily life. Can you find a moment of stillness amidst chaos? Can you consciously relax even when your to-do list feels endless? Savasana reminds us that restoration is not indulgence—it’s essential.
Join Us This Month
Throughout December, our teachers will emphasize the beauty of Savasana in every class. Expect guided relaxations, breathwork, and meditative practices tailored to deepen your connection with this transformative pose.
Let’s close out the year together with the grace of surrender and the gift of presence.
Namaste,
Cathy
Gratitude in Every Breath: Embrace the Spirit of Thanksgiving Beyond the Asana

As we approach the Thanksgiving holiday, many of us are already anticipating the delicious food, the warmth of family gatherings, and the joy of giving thanks. While the holiday season often calls for indulging in food and connecting with loved ones, it’s also a perfect time to reflect on the deeper meaning of gratitude and its role in our yoga practice.
At Thrive, we believe that gratitude is an essential part of the practice—one that goes far beyond the physical postures (asanas). Yoga teaches us to cultivate awareness, mindfulness, and connection, and these qualities can be extended to every aspect of our lives. This Thanksgiving, let's explore how we can bring the spirit of gratitude into our lives, both on and off the mat.
1. Gratitude in the Present Moment
One of the core principles of yoga is mindfulness—the practice of being fully present in each moment. In the midst of our busy lives, it's easy to get caught up in the whirlwind of thoughts, tasks, and distractions. But Thanksgiving provides a perfect opportunity to slow down and truly appreciate the present moment.
Take a few minutes each day to stop, breathe, and reflect on what you're grateful for. Whether it's the smell of a freshly brewed cup of tea, the warmth of a cozy blanket, or the people around you, these small moments of mindfulness can help you center yourself and tap into a deep sense of gratitude.
2. Gratitude for Your Body
While yoga asanas help us build strength and flexibility, it’s important to recognize that the body itself is a powerful gift. This Thanksgiving, take a moment to appreciate your body—not just for what it looks like, but for all the ways it supports you.
Honor your body by treating it with kindness. Practice self-care, rest when needed, and nourish it with wholesome foods. Remember that yoga is about cultivating a loving relationship with yourself, and gratitude is a powerful tool in nurturing that connection.
3. Gratitude in Relationships
Yoga also teaches us to connect with others with compassion, empathy, and kindness. As we gather with loved ones this Thanksgiving, take time to express your appreciation for those who support and care for you. A simple "thank you" or a thoughtful gesture can deepen relationships and remind us of the beauty in human connection.
Beyond the holiday table, consider how you can bring the principles of gratitude into your interactions with others. Whether it's a kind word, a thoughtful note, or simply being present for someone, these small acts of gratitude can have a profound impact on the lives of those around you.
4. Gratitude for the Journey
Yoga is not just a physical practice—it’s a journey of self-discovery, growth, and transformation. As we approach the end of the year, reflect on your own journey: the challenges you've overcome, the lessons you've learned, and the ways you've evolved.
Thanksgiving is the perfect time to honor the progress you’ve made, whether on or off the mat. It’s a reminder that every step, no matter how small, is a part of your path. Express gratitude for where you are, and trust that the journey continues to unfold in beautiful and unexpected ways.
5. A Mindful Thanksgiving Flow
As we move through this season of gratitude, consider incorporating a mindful practice into your holiday routine. Whether you join us for Aly's Heated Thanksgiving Flow on Thanksgiving Day or take time for a quiet, reflective meditation, these moments of self-care will help you stay grounded and connected to the present moment.
If you're looking for ways to bring yoga into your Thanksgiving celebrations, try creating a space for quiet reflection, journaling about your gratitude, or engaging in a short, gentle practice to set a positive tone for the day.
This Thanksgiving, we invite you to focus on gratitude not just as a holiday theme, but as a way of life. May you find peace in the present moment, appreciation for your body, and love in your relationships. As we continue to grow in our practice, both on and off the mat, let’s remember that gratitude is one of the most powerful tools we can use to cultivate joy, contentment, and connection.
Happy Thanksgiving from all of us at Thrive!
Pose of the Month: Santosha—Embracing Contentment and Gratitude

November is a time for reflection, and as we prepare for the season of gratitude, our yoga studio is focusing on Santosha, the niyama of contentment. While Santosha may not be a physical asana, its presence on and off the mat is a powerful way to live our practice in everyday life.
What is Santosha?
In the ancient teachings of yoga, the Niyamas guide us to live with purpose and peace. Santosha, the second niyama, translates to contentment. It's about finding joy and satisfaction in the present moment, exactly as it is. In a world filled with constant striving for more, Santosha encourages us to stop, breathe, and embrace the beauty in what we already have.
Santosha and Gratitude: A Perfect Pairing
November brings a collective focus on gratitude, which perfectly complements the practice of Santosha. Gratitude is a way of recognizing and appreciating the good in our lives, while Santosha asks us to find contentment, regardless of external circumstances. Together, they create a harmonious mindset that allows us to let go of desire and simply be.
Through yoga, we can practice this by acknowledging where we are in our bodies, not comparing ourselves to others, and appreciating the journey of our practice, rather than focusing on the end result.
Practicing Santosha on the Mat
Santosha isn’t about giving up ambition or goals; it's about recognizing the value of where you are today. Next time you flow through your vinyasa or settle into a restorative pose, invite contentment into each breath. Notice how your body feels without judgment. Santosha reminds us that the "perfect" pose is the one we are in right now.
Here are a few ways to embody Santosha on the mat:
Breathe deeply: Use your breath as a tool to anchor yourself in the present moment.
Release expectations: Allow your practice to unfold naturally, without striving for a certain outcome.
Celebrate small wins: Whether it’s holding a pose for a few breaths longer or finding a moment of stillness, embrace every accomplishment with gratitude.
Taking Santosha Off the Mat
Santosha extends beyond our practice and into our daily lives. During this season of gratitude, take a moment each day to recognize the abundance in your life, no matter how small. Find contentment in the little things—a warm cup of tea, the beauty of a sunset, or a kind word from a friend.
Remember, Santosha is not about complacency but about accepting life as it is. It’s finding peace in the present moment and knowing that, right here and now, you are enough.
Join Us in November
As we move into the heart of fall and the holiday season, let’s focus on cultivating Santosha both on and off the mat. Stay tuned for our yoga classes this month, where we'll weave in the theme of gratitude and contentment into our practice, creating space for self-reflection and growth.
Together, let's practice Santosha and express gratitude for all that we are and all that we have. Namaste!
Goldilocks and the Three Bears of Yoga: Finding Your Perfect Flow

Ever leave a yoga class feeling like it just wasn’t the right fit? Maybe it felt too slow, too fast, or perhaps it didn’t even "feel" like yoga to you. If this sounds familiar, you're not alone! This experience is a lot like the story of Goldilocks and the Three Bears—each class can feel too hot, too cold, or just right. But here's the good news: it doesn't mean the class, the teacher, or even yoga itself isn’t for you. It just means that particular style didn’t resonate with you, and that’s perfectly okay! Yoga is an incredibly diverse practice, and part of the journey is finding what clicks for you.
Let’s break down some of the key styles of yoga to help you navigate your own "just right" path:
Vinyasa Yoga
Often described as a "flow," vinyasa yoga links breath with movement in a dynamic sequence of poses. It’s adaptable for all levels, but you might find yourself moving at a quicker pace compared to other styles. It’s perfect for those who enjoy variety and like to get their heart rate up while maintaining mindfulness.
Ashtanga Yoga
A more structured practice, Ashtanga yoga follows a set sequence of postures that you repeat each time you practice. It's disciplined, challenging, and builds strength and flexibility over time. This is great for those who like routine and enjoy working on the same sequence to track their progress.
Iyengar Yoga
Precision, alignment, and detail are the heart of Iyengar yoga. Props like blocks, straps, and bolsters are often used to help you find the correct form. This practice is perfect for students who love to dive deep into their body’s alignment and enjoy a slower, methodical pace.
Power Yoga
If you’re looking for a more athletic and intense practice, Power Yoga might be your match. Inspired by Ashtanga, but with more flexibility in sequencing, Power Yoga focuses on building strength and endurance. It’s great for those who like a workout-style class that’s still rooted in yoga principles.
Hatha Yoga
Hatha is often considered the foundation of all yoga styles. It’s a more traditional approach that focuses on basic postures and breath control. Slower than a vinyasa or power yoga class, Hatha is perfect for beginners or those looking for a more gentle, mindful practice.
Restorative Yoga
The ultimate "slow down" practice, restorative yoga involves long holds in supportive postures, often using blankets, bolsters, and blocks. This class is all about relaxation and stress relief—perfect if you’re looking for deep rest and rejuvenation.
Yin Yoga
While it might look similar to restorative yoga, yin yoga is all about holding poses for longer periods to stretch the deeper connective tissues in the body. It can be intense, but incredibly rewarding for flexibility and releasing tension, both physically and emotionally.
Kundalini Yoga
A more spiritual and energetic practice, Kundalini combines postures, breathwork, chanting, and meditation to awaken your inner energy. It’s a great option if you’re seeking a transformative experience that goes beyond the physical.
Fusion Classes
In some classes, you might find a blend of these styles, or even additional elements like light weights or Pilates-inspired movements. At our studio, we offer classes that combine yoga with other forms of movement to create a well-rounded, balanced experience. For example, Kirsty’s mat Pilates class brings strength and core work into the practice, while Brianna’s Hot Hatha blends Yin, Vinyasa, and Power for a unique fusion flow. Every teacher has their own background, from different schools of yoga and personal practice, which adds richness to the diversity of classes we offer.
The Yoga Teacher Journey
Just like students, every teacher comes from a unique background. Some are drawn to dynamic practices like vinyasa or power, while others find their home in restorative or yin. Teachers like Camille combine restorative and stretch elements, creating a beautiful mix of flow and relaxation, while Rob emphasizes balance and mindfulness, with a deep commitment to dharma and breathwork.
At our studio, we encourage you to explore different styles and teachers. Yoga is a personal journey, and sometimes finding your perfect practice takes a bit of trial and error. And that’s okay! Whether you love the heat of power yoga, the alignment of Iyengar, or the deep stillness of restorative, there’s something here for you.
So next time you step on the mat and it doesn't feel quite right, remember: you’re not Goldilocks, but you are on a journey to find the class that feels "just right" for you. Keep exploring, keep trying new things, and trust that your perfect yoga practice is out there waiting.
See you on the mat! ✨
October Pose of the month Utthan Pristhasana: Lizard Pose.

Purpose
Here are some of the reasons why Lizard Pose is good for you:
Stretches and opens the hips increasing mobility and flexibility
Stretches and strengthens glutes, hamstrings, and the spine, releasing tension in the back
Helps reduce the negative effects of prolonged sitting or inactivity
Helps relieve soreness in the inner thighs
Can help lengthen your stride, increase power and agility in changing directions, and reduce the risk of injury to your hamstrings
POSE GUIDE
Do’s—In order to do Lizard Pose correctly, here are the steps:
Begin on your hands and knees with your hands close to the short edge of your mat
Align your hands directly beneath your shoulders with your middle fingers facing forward.
Align your knees directly beneath your hips and your feet directly behind your knees.
Shift your weight into your left leg, and bring your right leg forward placing your right foot just outside your right hand. Your right knee will be bent and stacked directly over your foot.Your hips will stay squared to the front of your mat. You should feel a stretch in front of the left hip, above the thigh.
Pivot on your right heel to rotate your toes out about 45 degrees.
Lengthen your spine, and engage your core.
Lower your forearms to the floor, placing your elbows directly beneath your shoulders and your hands directly in front of your elbows. Your middle fingers are still facing forward.
Press the hands into the ground to activate the arms.
Hug your right knee against the right arm and shoulder engaging the inner thigh. You will feel a stretch in the right hamstrings and glutes.
Scoop your hips forward and down toward the ground, feeling a stretch in the hip flexor, in front of the left thigh.
Continue to lengthen the spine and engage the core as you focus your gaze forward.
Repeat on the other side.
Practical Tips
Don’ts—Common mistakes beginners make in lizard:
Not engaging the inner thighs: There’s a lot going on in this pose. It can be difficult to keep it all happening at once. Beginners especially can forget to engage the inner thighs during Lizard. However, activating the inner thigh of the back leg can be a real game changer in how you experience this pose. It pulls the alignment together making it easier to maintain the position, and it intensifies the strengthening and stretching benefits through the thighs and groin muscles. If you’re having trouble understanding how to engage your inner thigh, think about trying to rotate the front of your thigh toward the midline of your body, while still keeping the knee facing the ground and the foot reaching directly behind your hip.
Letting the bent knee sway out away from the body: It’s common to find the front bent knee swaying out away from the body in this pose. When you amplify the external rotation of the front hip in that way, you are diminishing the stretch available for your glutes and hamstrings. This can also exacerbate sciatic discomfort and low back tension. For proper form, hug your front bent knee into your arm and shoulder maintaining active contact for the duration of the pose.
Forgetting to engage the core: Because Lizard is such an involved pose with several active parts, the core can sometimes get a little lazy and start drooping down toward the ground. This can weaken the pose, opening your back, glutes and hips up for potential injury or unnecessary tension. Keep the core engaged during the entirety of the pose to create a strong foundation for the back of the body, making for a safer and more effective Lizard pose.
Rounding the back: It’s common to see beginners rounding the back toward the sky and dropping the head and neck toward the ground. This is incorrect and can lead to injury or discomfort, particularly through the upper back and neck. Instead, make sure you are keeping your back as flat as you can. Elongate your spine and engage your core. Keep your gaze forward to keep the back of the neck in line with the rest of the spine.
Front knee past ankle: Keep your front knee aligned over your front ankle to avoid putting your knee in a compromising position and straining the ligaments.
Stance too short: Beginners may not plant the front foot far enough forward. If the stance is too short, it can lead to rounding of the back and a compromising position for the front knee as mentioned above.
Props and Modifications
Reason for modification—You should consider a modification if you experience the following:
Excessive tightness and limited flexibility in the hip flexors (front of thighs and lower abdomen) and groin
Discomfort in the knees
Overly tight glutes and limited range of motion in hips
Excessive back pain/discomfort or tension
Discomfort or restriction in the shoulders
Excessive back pain/discomfort or tension:
Place your hands on the ground beneath your shoulders, keeping your arms straight instead of lowering onto forearms. This allows the back to remain more upright, making it easier to keep the proper alignment in the spine, and decreasing tension in the back.
Alternatively you can place your forearms on a couple of blocks.
Discomfort or restriction in the shoulders:
If the shoulders are feeling excessive tension or pinching, try resting your forearms on blocks to alleviate the strain of the spinal fold. This creates more space for the shoulders to open and relax.
Overly tight and inflexible glutes and hips:
Try taking your front foot a little further out away from the body to create more space for the hips and glutes in this pose. Make sure to keep the knee over the foot to protect the knee and ankle.
Excessive tightness and limited flexibility in the hip flexors and groin:
Try placing your hands on the ground beneath your shoulders, keeping your arms straight instead of lowering onto forearms. This will decrease the intensity of the stretch at the hip flexors and groin.
Discomfort in the knees:
If you’re experiencing discomfort in the front bent knee, make sure you are hugging it close to the body so that it stays in proper alignment.
If you’re experiencing discomfort in your back knee you can place a folded blanket or towel between your knee and the ground to provide some additional cushion.
You can also elevate your back knee off the ground. To do this, curl your back toes under, lifting your left knee off the ground and stacking your back heel over your toes. Extend through the back heel to elongate and activate the left leg. Lift the back of the left leg toward the sky to keep the leg fully engaged and active.
Cool down, man! an inspiring yoga flow for the end of summer

When preparing a yoga class, I always consider the current weather and season. When I approach summertime, I favor the elements of ether/space and earth.
Space offers an opportunity to slow down, reflect, and expand. Earth provides the stability that allows for growth in all directions. In yoga, the earth element is accessed through strong standing postures, poses where the hands and feet are rooted to the ground.
The balancing practice here starts strong, then gradually slows down to promote coolness and a relaxed state.
Mountain with Mudras
Come to stand at the top of your mat in Tadasana/Mountain. Bring your palms together in front of your heart for Anjali Mudra. Bring the palms together and draw the thumbs to your heart space.
Allow the hands to become parallel to the earth - opposite of each other, drawing the index, middle, ring and pinky fingers into a “c” clasp for your Ganesha Mudra. Wrap your thumbs around the outer pinky edges of your hands. This mudra opens up the heart, and allows your to move past any obstacles.
Standing Sun Breaths
On an inhale, reach the arms overhead into an Urdhva Hastasana/Upward Salute; interlace your fingertips at the top, pulling the triceps and pinky sides of the hands to the back of your mat. As you exhale, soften the knees, hinge from the hip space and gently press your palms toward the earth to come into Uttanasana/Standing Forward Bend. As you inhale, release the hands, sweeping the arms and body to arrive back into Urdhva Hastasana and repeat this movement three to 10 times, slowing down the exhale as you progress.
Moon Salutation
Inhale the arms overhead into Urdhva Hastasana/Upward Salute. Exhale into Uttanasana/Standing Forward Bend; inhale to Ardha Uttanasana/Half Standing Forward Bend with a long spine. On an exhale, fold forward and step back to Anjaneyasana/Low Lunge, back knee on the ground. Interlace your thumbs and inhale the arms overhead.
Exhale into Ardha Hanumanasana/Half Split, straightening the front leg (soft knee!) and folding over it, hands framing the front leg. If your hamstrings are tight, place your hands on blocks for support. Inhale, and bend the right knee and bring your arms overhead, back to Anjaneyasana/Low Lunge.
Repeat the flow on the other side. Do one to three rounds of Moon Salutation.
Vinyasa Flow
Once you complete the second side of the last round of your Moon Salutation, arrive at the top of your mat.
On an inhale, reach the arms overhead into an Urdhva Hastasana/Upward Salute. As you exhale, soften the knees, hinge from the hip space and gently press your palms toward the earth to come into Uttanasana/Standing Forward Bend. As you inhale, arrive in Ardha Uttanasana/Half Standing Forward Bend.
Release the hands to the mat, pointer fingers in alignment with shoulders, and engage through your Hasta Bandha (pressing through the finger pads, ballmounds and heels of the hands, keeping palms soft). Step your feet back into Phalakasana/Plank or Ardha Phalakasana/Half Plank bringing your shoulders over wrists, heels over toes, long spine and engaged core.
Inhale, begin to shift forward on the toes so your wrists are just slightly over the line of your wrists and activates the muscles of the upper back. As you exhale, lower down until the insides of your biceps frame out your ribcage finding Chaturanga/Four Limbed Staff. Be sure to engage the chest, core and thigh muscles so the posture is safely supported. If you need a modification, you may lower down to Ashtanga Namaskar/8 Point Pose.
On the next inhale, stay with the engaged Hasta Bandha as you press the earth away from you, lengthening the arms, releasing the shoulders away from the ears, projecting your crown of the head to the sky and your heart forward, pressing down through the tops of your feet for your Urdhva Mukha Svanasana/Upward Facing Dog -OR- press down through the thighs and tops of your feet for Bhujangasana/Cobra.
Exhaling, tuck your toes, engage the core, press the top of the mat away from you, drawing the underarms towards the heart and lengthen the backside of the body to the sky for Adho Mukha Svanasana/Downward Facing Dog.
You may repeat this one to three times.
WARRIOR II FLOW
From Adho Mukha Svanasana/Downward Facing Dog, inhale the right leg behind you towards the sky. Exhale draw the knee towards the chest and round the upper back like a cat. Exhale step the right foot through the thumbs and bend the right knee directly over the right ankle and reach the arms out into a T for Virabhadrasana II/Warrior II. Bring the left foot parallel to the back of the mat and hug the left hip and left shoulder towards the top right corner of your mat, and spin your right thigh towards the right side of the room to avoid the inner knee from collapsing inwards. In this variation, kep the palms face up to promote cooling. Hold Virabhadrasana II/Warrior II for three to five breaths.
On an exhale, straighten your right leg into Trikonasana/Triangle. The right hand can reach down for a block, the shin, or the floor. For more heat, float the right and left hand parallel to one another. Hold Triangle for five to 10 breaths.
On an exhale, soften the right knee (small bend) and move the right hand towards the top right corner of your mat. You may use a block if your hand cannot reach the mat. Inhale, lift the left leg into Ardha Chandrasana/Half Moon. The left leg reaches to the back wall as the left side body and hip stacks on top of the right. The left arm can either hold onto the left hip or it can reach toward the sky. Soften your gaze—which can be down toward your rooted big toe or up toward your extended thumb. Expand through the back of your heart and relish the space around your limbs. Hold Balancing Half Moon for three to five breaths.
Slowly release the back left foot towards the back of the mat and bring the body back into the alignment of Virabhadrasana II/Warrior II. Bring the hands down to frame out the right foot as you simultaneously spin the left foot so the toes point forward. Step the right foot back so the body aligns into Phalakasana/Plank. Follow your Vinyasa Flow - Chaturanga/Four Limbed Staff Pose or Ashtanga Namaskar/8 Point Pose, arriving in Adho Mukha Svanasana/Downward Facing Dog.
Repeat the flow on the other side.
Tree Flow
After you complete the second side of your Virabhadrasana II/Warrior II Flow, arrive at the top of your mat in Tadasana/Mountain Pose. Ground down through your right leg, engaging through your quad thigh muscle and hug your left knee towards your chest. place the sole of the left foot on the inside of the thigh, calf or ankle for Vrikshasana/Tree pose. Just make sure that the foot is not pressing into the knee joint. You can reach your arms overhead, bring your Anjali Mudra to your heart, or keep them resting on your hips. Whichever arm variation you choose, make sure that the arms are moving away from the midline in order to air out the sides of the waist and your armpits. Hold Tree pose for five to 10 breaths.
Release your left foot from Tree but keep the leg lifted. Reach for your left big toe and extend your left leg out in front of you for Utthita Hasta Padangusthasana/Extended Hand-to-Big-Toe pose. If you are new to this posture, bend the left knee and wrap your fingers around the front of the shin. Hold for three to five breaths.
Repeat the flow on other side.
Balancing poses create stability. As you move through this sequence, keep your eyes soft, the back of your heart open, and the breath smooth and silky.
Releasing
Now the cooldown begins.
From Tadasana/Mountain Pose, you may enter through a Vinyasa Flow, or slowly transition into Balasana/Child’s Pose. If you are moving through a Vinyasa Flow, you may enter into Balasana/Child’s Pose from Adho Mukha Svanasana/Downward Facing Dog. Stay in Child’s Pose for five to ten breaths.
On an inhale, lift into Table.
Exhale forward into Bhujangasana/Cobra, expanding through the heart center.
Inhale back to Table, and a long exhale takes you back to Child’s pose, gently rounding the spine.
Repeat this flow three to 10 times. Enjoy a brief pause at the end of the exhale each time you come into Balasana/Child’s pose and Bhujangasana/Cobra.
After your last Balasana/Child’s Pose, come to sit on the earth or the edge of a blanket if you hips need some elevation. Press into your sit bones and allow the spine and crown to lengthen upward. Begin to find your way into Baddha Konasana/Bound Angle by bringing the soles of feet together, lengthen out from the inner thighs to the outer knees. Ground down evenly through your seat. Soften your breath as you slowly fold forward on an exhale reaching your heart towards to the top of your mat. Hold Bound Angle for five to 10 breaths.
Savasana
In the summer, allow for a spacious Savasana/Corpse Pose. Lay on your back, lengthen the spine and cervical spine. Create space by extending your arms and legs so that they are wider than your mat. The palms face up. Close the eyes or cover the eyes with a cool towel. Soften into the earth, and release your breath to a whisper. If you cannot find Savasana/Corpse Pose on your back for any reason, please take a Parsva Savasana/Side Lying Pose on your left side while using your left arm as a pillow. Allow 8 - 10 minutes minutes for rest and integration.
Namaste!
- Cathy
May Pose of the Month

At our studio, we're always seeking to delve deeper into the rich tapestry of yoga asanas. This month we’re exploring the journey to mastering Bakasana, commonly known as Crow Pose.
Bakasana is a foundational arm balance that not only strengthens the upper body but also cultivates balance, focus, and courage. This asana requires both physical and mental discipline, making it a beautiful metaphor for overcoming challenges on and off the mat.
Benefits of Bakasana
Strengthens the Core: Bakasana primarily targets the core muscles, including the abdominals and obliques, helping to build stability and control.
Improves Balance: Balancing the body on the hands while engaging the core and shifting weight forward teaches us to find equilibrium amidst instability.
Enhances Concentration: As we concentrate on maintaining the pose and breathing steadily, Bakasana becomes a powerful tool for sharpening mental focus and presence.
Boosts Confidence: Successfully mastering Crow Pose boosts confidence and self-assurance, encouraging practitioners to explore new possibilities both on and off the mat.
How to Do Crow Pose or Bakasana
First thing's first, this can be pretty scary, so acknowledge this fact and just tell yourself you can do this.
Once you have warmed up your hands and wrists, maybe by stretching them, gentle presser on the hands and wrists-whatever you need to do to get your hands ready for this weight. Then, follow these steps:
(be sure you have a block or bolster nearby)
Start in Yogi Squat or Malasana Squat
Place your hands shoulder's width distance apart on the mat between and in front of your toes.
Spread your fingers out wide and screw your hands into the mat so your pointer fingers are in alignment with your shoulders.
Lift your hips up and wiggle your feet closer together
Variation 1:
Bend your elbows back as if you’re coming into chatturanga. That will engage your chest, shoulders and upper back.
Place your knees as high up on to the triceps as you can
Shift your weight and gaze slightly forward. Do not shift your gaze with your chin!
Try to bring one heel to your bottom while steadying yourself with the other foot.
Switch feet, trying to bring opposite heel to your bottom.
When you think you're ready, try lifting both heels up towards your bottom.
Variation 2:
Bend your elbows back as if you’re coming into chatturanga. That will engage your chest, shoulders and upper back.
This time, place your knees to the outside of your triceps
Squeeze your knees together
As you squeeze, think about lifting one or both heels.
Shift your weight and gaze slightly forward. Do not shift your gaze with your chin!
Try to bring one heel to your bottom while steadying yourself with the other foot.
Switch feet, trying to bring opposite heel to your bottom.
When you think you're ready, try lifting both heels up towards your bottom.
One thing you can do to help you is to start out with your feet on a block. This way, your feet are already in crow position and it helps your shoulders and hands get used to the idea of all that weight on them.
Anytime we put ourselves in an unstable and awkward position, we’re petrified of face planting. To overcome the face planting fear, start with your head on a block or on a bolster.
Everyone is different, so play with these adjustments and let me know what you think.
Remember, this pose takes A LOT practice. Don't give up. Anything worth having is worth working towards, so keep at it. You can practice this pose every day if you'd like, just a couple of moments at a time. If your wrists start to hurt, then take some time off and revisit on another day. Yoga is like golf, you'll never master it, so be happy to practice and tell the pose, "until tomorrow."
Bakasana invites us to embrace the beauty of balance, both physically and mentally. As we cultivate strength, focus, and courage on the mat, we nourish these same qualities in our daily lives, empowering us to face challenges with grace and resilience.
April Pose of the Month

Welcome, fellow yogis, to another exciting journey on our mats! Today, we're diving into the serene realm of Vikasitakamalasana, also known as the Blossoming Lotus Pose. Just like a lotus gracefully unfurls its petals, this pose invites us to unlock our inner beauty and radiate positivity. So, roll out your mat, take a deep breath, and let's blossom together!
Picture yourself in a serene garden, surrounded by lush greenery and vibrant flowers. The air is filled with the sweet scent of blossoms, and the gentle rustle of leaves creates a soothing symphony. As you step onto your mat, feel the earth beneath you supporting every movement, grounding you in the present moment.
How to do Vikasitakamalasana / Blossoming Lotus Pose?
1. Begin in Bhujapidasana / Shoulder Pressing Pose.
2. Exhale and sit down. Lean backwards and balance your weight on your sitting bones. Rest your calves on your forearms to support your legs.
3. Press your heels together and open your palms to face the sky.
4. Inhale and straighten your spine.
5. Tighten your abdominal and pelvic muscles.
6. Touch the tip of your index fingers with the tip of your thumbs.
7. Close your eyes and stay in this pose for as long as you can.
As you slowly release from Vikasitakamalasana, take a moment to express gratitude for this opportunity to nurture your body and soul. Just like the lotus flower, may you continue to bloom and grow, spreading love and light wherever you go. Until next time, remember to keep exploring, keep evolving, and keep blooming brightly on your yoga journey.
march pose of the month

Embrace Strength and Renewal with March's Post of the Month: Urdhva Mukha Svanasana
As March blooms with the promise of renewal and vitality, there's no better time to embrace the rejuvenating power of yoga. This month, we shine the spotlight on Urdhva (Upward) Mukha (Facing) Svanasana (Dog), a dynamic posture that embodies strength, openness, and energy. Let's dive into the depths of this empowering asana and explore how it can elevate your practice and invigorate your spirit.
Understanding Urdhva Mukha Svanasana: Urdhva Mukha Svanasana is a fundamental yoga pose often incorporated into vinyasa and hatha yoga sequences. Its Sanskrit name translates to "Upward-Facing Dog Pose," reflecting the posture's resemblance to the graceful arch of a stretching dog. In this pose, the practitioner lifts the torso and pelvis off the ground while balancing on the hands and the tops of the feet, creating a deep arch through the spine.
Benefits of Urdhva Mukha Svanasana:
Strengthens the Back: Urdhva Mukha Svanasana engages the muscles along the spine, including the erector spinae, to build strength and stability in the back.
Improves Posture: Regular practice of this pose can help correct rounded shoulders and alleviate stiffness in the upper back, promoting better posture.
Stretches the Front Body: The pose opens the chest, shoulders, and abdomen, counteracting the effects of prolonged sitting and hunching over electronic devices.
Stimulates Energy Flow: Urdhva Mukha Svanasana activates the solar plexus and heart chakras, fostering a sense of vitality and empowerment.
Enhances Respiratory Function: The expansive nature of the pose encourages deep breathing, increasing lung capacity and oxygenation of the body.
Tips for Practicing Urdhva Mukha Svanasana:
Alignment is Key: Focus on aligning your wrists beneath your shoulders and spreading your fingers wide for a stable foundation.
Engage the Hands: Create a Hasta Bandha by pressing through the finger pads, ball mounds of hands and heels of the thumbs to mitigate the tension that can build up in the wrists and forearms.
Engage the Core: Draw the navel toward the spine to support the lower back and prevent overarching.
Lift Through the Chest: Imagine lengthening the sternum forward and upward while broadening across the collarbones for a deeper opening.
Press into the Tops of the Feet: Maintain active engagement in the legs by pressing firmly into the tops of the feet and lifting the kneecaps.
Modify as Needed: If you experience discomfort or strain, consider placing a folded blanket or bolster under the thighs or lowering the knees to the mat for a gentler variation.
Urdhva Mukha Svanasana invites us to rise with strength, grace, and resilience, embodying the spirit of renewal that defines the month of March. As you incorporate this empowering pose into your yoga practice, may you cultivate a sense of vitality, openness, and inner radiance that uplifts you both on and off the mat. Embrace the transformative power of Urdhva Mukha Svanasana and awaken to the infinite possibilities of your practice and your life.
Desk Yoga Delight
Hello desk warriors! If January felt like the longest month ever and you find yourself “officially” back to work, it's time to break free from the sedentary shackles and infuse some yoga magic into your workday. Sitting in front of the computer for long hours can take a toll on your body and mind. But fear not! We've got a rejuvenating desk yoga sequence to help you stretch, relax, and boost your energy levels. So, roll out your imaginary yoga mat (or just clear some desk space), and let's dive into a yoga escape at your desk!
Pose 1: Seated Cat-Cow Stretch
Start by sitting tall in your chair. Inhale, arch your back, and lift your chest (Cow Pose). Exhale, round your spine, and tuck your chin to your chest (Cat Pose). Repeat for a minute to release tension in your spine.
Pose 2: Neck Stretches
Gently tilt your head to one side, bringing your ear toward your shoulder, and hold for a few breaths. Repeat on the other side. Roll your neck in slow circles, both clockwise and counterclockwise, to release neck stiffness from staring at the screen.
Pose 3: Seated Forward Fold
Scoot to the edge of your chair, inhale, lengthen your spine, and exhale as you fold forward from your hips. Let your chest rest on your thighs, and reach for the floor. Hold for 30 seconds to stretch your back and hamstrings.
Pose 4: Seated Spinal Twist
Sit with your feet flat on the floor. Inhale, lengthen your spine, and exhale as you twist to one side, placing your opposite hand on your knee and the other hand behind you. Hold for 30 seconds on each side to relieve tension in your spine.
Pose 5: Desk Downward Dog
Stand and place your hands on the edge of your desk, walking backward until your body forms an inverted V shape. Stretch your arms, elongate your spine, and press your heels towards the floor. Hold for one minute to stretch your entire body.
Pose 6: Wrist Stretch
Extend your arms in front of you, palms facing down. Gently press your fingertips towards the floor with your opposite hand. Hold for 15 seconds on each hand to alleviate wrist strain from typing.
Pose 7: Seated Eagle Arms
Sit comfortably, raise your arms, and cross one over the other, bringing your palms together. Lift your elbows and relax your shoulders. Hold for 30 seconds, then switch arms. This pose relieves tension in the upper back and shoulders.
Pose 8: Seated Figure Four Stretch
Sit tall, cross one ankle over the opposite knee, and gently press down on the crossed knee. Hold for 30 seconds, then switch legs. This stretch opens up your hips and releases tension in the lower back.
Pose 9: Ankle Rolls
Sit with your feet flat on the floor, lift one foot, and rotate your ankle clockwise for 10 seconds, then counterclockwise for 10 seconds. Switch to the other foot. This helps improve circulation and flexibility in your ankles.
Pose 10: Seated Meditation
Close your eyes, take a few deep breaths, and focus on the present moment. Inhale positivity, exhale stress. Take a minute to center yourself before returning to your tasks.
And there you have it – a quick and effective desk yoga sequence to refresh your mind and body during the long work hours. Remember, taking short breaks for these rejuvenating poses can significantly contribute to your overall well-being. So, embrace the yogic escape and let your January blues melt away. After all, a little desk yoga is the perfect antidote to the longest month ever!
February Pose of the month
As Valentine's Day approaches, what better way to celebrate the season of love than by opening your heart both metaphorically and physically? In the world of yoga, there's a beautiful and empowering pose that not only strengthens the body but also opens the heart – Setu Bhanda Sarvangasana, commonly known as Bridge Pose. This asana not only stretches and tones various muscles but also serves as a gateway to emotional well-being and heart opening. Let's delve into the intricacies of Setu Bhanda Sarvangasana and explore the myriad benefits it brings, particularly in terms of unlocking the heart chakra.
Setu Bhanda Sarvangasana is a backbend that engages various muscle groups, including the legs, glutes, and the entire back. The pose resembles a bridge, with the body forming a gentle arch. The name "Setu Bhanda Sarvangasana" is derived from Sanskrit, where "setu" means bridge, "bhanda" means lock, and "sarvanga" means whole body. As the name suggests, this pose involves creating a bridge-like shape with the body while engaging and locking certain muscles.
Start by lying on your back with your knees bent over your ankles and feet hip-width apart.
Place your arms alongside your body, with your palms facing down to create an anchor.
Press through your feet (particularly the hells) and lift your hips towards the ceiling, lengthening your chin towards your chest to elongate the cervical spine.
As the hips lift, create space between the the fronts of the shoulders and ribcage space by pressing the backs of the shoulders into the mat, and interlacing your fingers under your back and roll your shoulders beneath you, creating a strong foundation.
Keep your thighs parallel to each other and breathe deeply into the chest.
Hold the pose for 30 seconds to a minute, focusing on the lift of the chest and the opening of the heart.
Why practice Setu Bhanda Sarvangasana?
Heart Chakra Activation:
Setu Bhanda Sarvangasana is known for its ability to stimulate and open the heart chakra, Anahata. This energy center is associated with love, compassion, and emotional balance. As the chest lifts in this pose, practitioners often experience a sense of expansion and release, fostering a deeper connection with their emotions and the world around them.
Improved Circulation: The gentle inversion created by Bridge Pose encourages blood flow to the heart, enhancing circulation and oxygenation. This can have positive effects on cardiovascular health, helping to reduce the risk of heart-related issues.
Relief from Stress and Anxiety: Backbends, including Setu Bhanda Sarvangasana, are known for their stress-relieving properties. By opening the chest and stretching the front of the body, tension in the shoulders and neck is released. This can contribute to a sense of calm and relaxation, reducing symptoms of anxiety and stress.
Enhanced Lung Capacity: The expansion of the chest in this pose allows for deeper and more conscious breathing. Improved lung capacity not only oxygenates the body but also supports respiratory health, benefiting the entire cardiovascular system.
Posture Improvement: Regular practice of Setu Bhanda Sarvangasana strengthens the muscles in the back, shoulders, and neck. This, in turn, contributes to better posture, aligning the spine and promoting overall spinal health.
Setu Bhanda Sarvangasana is more than just a physical exercise; it is a doorway to emotional and spiritual well-being. As you embrace this pose, feel the gentle opening of your heart and the liberation of your emotions. Whether you're a seasoned yogi or a beginner, integrating Bridge Pose into your practice can be a transformative journey towards a more open and compassionate heart. Allow your practice to be a bridge connecting you to the profound depths of your inner self, fostering love, acceptance, and a sense of interconnectedness with the world.
Namaste,
Cathy
January pose of the month
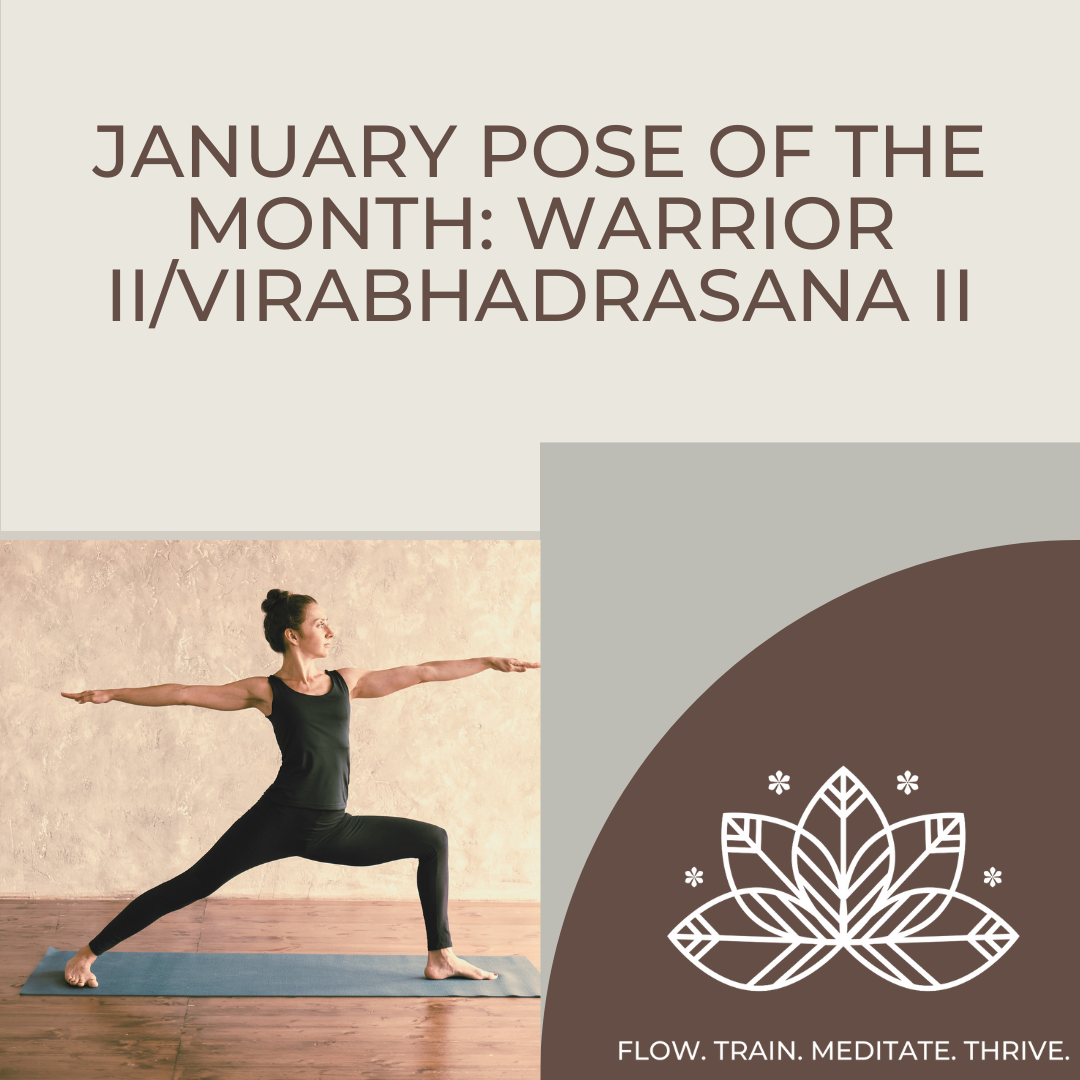
It’s a new year and with it brings new intentions, resolutions, goals, desires. Perhaps your New Year goals or intentions include trying something new, like yoga. Take a minute to think about the last time you tried something new. Maybe you can recall the first time you practiced yoga or the last time you tried a challenging yoga pose. How did it feel? Did it feel like it took a lot of effort in the beginning? Chances are it didn’t come easy at first and took some extra effort. You probably felt your muscles shaking, your jaw clenching, your breath becoming shallow and uneasy, your gaze and/or other parts of your body hardening. I am personally a creature of habit, but in order to grow both in life and our practice, we need to step outside of our comfort zone.
In Sanskrit the word abhyasa means effort or practice. It refers to a practice that is done regularly and constantly over a long period of time. Most significantly, it refers to a practice that aims at achieving a tranquil state of mind. This for many is found in the practice of yoga. You show up for your practice, get on your mat, and begin each practice with a mindset that no matter how long you’ve been practicing there is always something new to be learned and effort to be made. So right from the start, with this mindset you’re letting go a little… letting go of the ego or expectations.
In sutra 1.12 of his Yoga Sutra, Patanjali says…
“Abhyasa-vairagyabhyam tan-nirodhah”
This translated means that in order to stop the whirlings of our mind, the fluctuations, we have to adopt a 2-step method. This 2-step method is abhyasa and vairagya.
Vairagya is translated as non-attachment or letting go. Whether it’s for yoga or anything in life that we do, we show up and put in our best effort (abhyasa) while also letting go (vairagya). So what do we let go of exactly you may be wondering? Vairagya means being content with what is, letting go of attachment to a result, end goal, or the fruits of ones’ labor. So while the two- abhyasa and vairagya- may sound contradictory, it is possible to practice both. We put diligent, consistent effort into something without expecting anything in return.
When we can “sit” with anything that causes whirlings in our mind (good and bad), when we don’t run from those whirlings or resort to blaming (and if we do we recognize it), when we practice detachment from it all… little by little it becomes easier to “sit” with… little by little the “chatter” that is no longer serving us will fall away and we will be able to see and identify with our true self and what’s truly meant for us.
Our January pose of the month is Warrior II pose, Virabhadrasana. In Sanskrit, Vira means hero and badhra stands for friends. So together Vira+bhadra essentially means distinguished hero. Asana means pose. Virabhadrasana is named after the fierce warrior, Virabhadra.
The story or myth behind Virabhadra is dark and one of rage, revenge, and compassion. The warrior series of poses- warrior I, warrior II, warrior III, humble and peaceful warrior- all give us the opportunity to experience the sensations and feelings of being a strong and fierce, yet also compassionate and peaceful warrior. This may sound just as impossible and contradictory as the concepts of abhyasa and vairagya in practice together.
Next time you’re practicing Warrior II try to put the 2-step method of abhyasa and vairagya to practice. Do this first by letting go of any thoughts and trying as best as you can to connect to the present moment. When thoughts come to mind, as they will at some point or maybe even several times in your practice, try not to “sit” with them for too long. Just acknowledge them and let them go as quickly as possible. Now this is a practice in and of itself, so be patient and just keep trying to let go of the chatter to find peace and ease mentally.
Additionally, try to find physical peace and ease while still remaining alert and strong. Try to connect to a balance… what is just enough effort and physical strength needed to hold the pose, and where can you relax and soften more. When you’re present in the deep lunge and open arms of the pose, there is a challenging intensity that probably doesn’t naturally make you feel relaxed. It takes effort and practice to get there. As you gaze over your front arm, is your gaze soft? Is your jaw clenched? Are your shoulders shrugged up tightly by your ears? Can you surrender the will to force a particular outcome in the pose?
Think about how much more strength it takes a warrior to be calm and at peace during times of madness. It may feel like it takes a lot more work to embody the essence of Virabhadra- to be a strong, fierce, compassionate, and peaceful warrior. That is why it’s called yoga practice. It’s a practice and the beauty is that there is no end goal or “destination” to reach in your yoga practice, so let go of the need to get there quickly and just practice.
To practice Virabhadrasana II follow the steps below (we’ll start with the right foot forward):
• Stand facing the long edge of the mat
• Raise arms to shoulder height and step feet as wide as hands.
• Step your left foot towards the back of your mat and pivot on the ball mound until the pinky side of your left foot is parallel to the back short end of your mat.
• Check your right toes and make sure that they’re pointing forward towards the front short end of your mat and check to see if your right heel and left arch match up.
• Bend the right knee to stack the knee over the ankle.
• Make sure you are grounding through the toe pads, ball mounds and heels of both feet.
• Squeeze both quads (think pulling the muscles and bones together) to engage the outer thigh to keep the center of the knee tracking toward the second toe on each foot.
• Engage the glutes and feel the left seat pull towards the top right corner of the mat.
• Turn the gaze to look over the right finger tips.
• Create space between the shoulders and the ears.
• Repeat on the left side.
Benefits:
• Strengthens and stretches your legs, ankles and feet
• Stretches your hips, groins and shoulders
• Opens your chest and lungs
• Builds stamina and concentration
• Energizes tired limbs
• Stimulates your abdominal organs
• Helps relieve backaches
• Develops balance and stability
• Improves circulation and respiration
• Therapeutic for flat fleet, sciatica, osteoporosis, and carpal tunnel.
Here’s to stepping into the New Year with pure thoughts, strong intentions, and humble actions.
Namaste,
Cathy